Rigging overview - Tentacle WEEK_01
1. We created a simple cube (9 divisions high, 2 width & 2 depth)
2. Looking at the corner view, scaled outside vertexes into a cylinder
3. Using snap tool (shortcut -> x), create a joint for every 3 units (side view)
4. Select joints -> Skin -> Bind skin
Building Controls:
1. Create circle -> scale it -> duplicate (3 times), align with the joints (snap)
2. Freeze transformations
3. Rename circles (Rename everything generally to help the process)
4. Orient Constraint -> Maintain Offset (tick)
5. Select Parent & Child (parent everything)
Creating Expressions:
1. Select control -> Z rotation -> right click -> Create Expression
2. Copy the joints name and enter the formula ( (name)Z = noise(time*2(defines how quick))*10(defines how far))
For ex: JT_01rotationZ = sin(time*2)*30
3.Create

MASH:
MASH is a great way to create motion graphics in Maya.
By simply using couple of nodes and tweaking some settings, very interesting effects can be achieved.
Joint Creation - ROBOT
Week_02
This week, we looked up at the correct joint creation.
1. We started off, by creating 4 joints in a positive X axis, snapped on to the grid. We used only 3, but to create a correct joint orientation, we created an extra one.
To know when the orientation is right, X always has to go down the joints. To check it: transform -> Display local orientation.
2. We had to place joint carefully into the robots art. To do that , we used snapping tool (V), selecting the joints and snapping them onto the local orientation sign of the shoulder.
3. After that, we aligned the joints, with rotation tool and Transform tool along the arm(any other tools are not allowed, as they will mess up the orientation).
4. Delete the 4th joint, as it is not needed anymore.
5. Select the joint and from Attribute Editor transfer the rotation data: Transform Attributes rotate -> Joint Orient and force 0 in the Transform attribute rotation windows.
Repeat the same step for each joint.
This will help to get more accurate joint orientation.
6. Same process goes with legs and spine. DO NOT FORGET TO NAME THE JOINTS.
7. When one side is done, after we can Mirror the joints in the Mirror Joint Options window.

8. Fix the orientation of the mirrored joints as well, to maintain correct orientations.
9. By using Parent & Child relationship, connect spine with arms and legs.
10. By using 'Connect joint Option ->Parent Joint' connect the robot and the joint system.
Extra: Rendering the robot
Skinning
Week_03
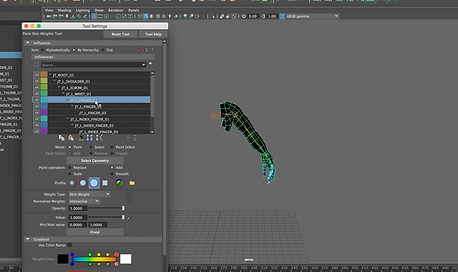
This week, we were looking at skinning the arm. Tools that we learnt:
1. Paint weight tool
Things to remember about the 'Paint Weight Tool':
1) Each vertex gets a skin cluster
2) Flood goes between 0 and 1
3) Black color indicates no influence
4) White color indicated influenced parts
5)Everything is color coded
6)When painting weights, animate the object, to make work more efficient

Firstly, We started animating shoulder, then went down to elbow, wrist and fingers.

1. Leave all the joints locket and unlock only two ones that affecting each other. In this case it is shoulder and elbow.

2. Go to Select -> Vertex -> Select vertexes that will be affected -> Paint (Mode) -> Replace (which means that we would like to replace the desired area) -> Check the Values (this time it was 1, since we wanted to achieve full influence) -> Flood
3. Smooth -> change to desired value -> Add (select 0.1, or other desired value (Sometimes skinning is not perfect and we need to use other tools to help))
4. Check the skinning by turning on the animation
5. Same way carry on with the rest.
6. When painting the fingers, to separate the animation, go to : Display -> Animation -> Dope Sheet and by selecting finger joints use middle mouse to drag them

Playblast of the skinning:
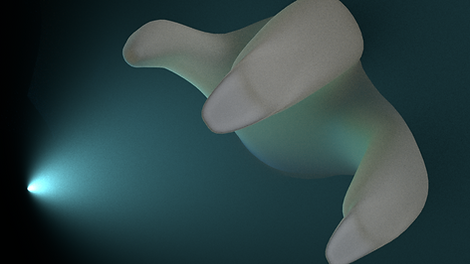
Rendering:
1. We created camera and 2 spotlights (one for general light, another for hands close-up).
2. Crated AiStandard material and changed colors.
3. Tweaked Subsurface.
4. Looked up AiAtmosphereVolume (Render Settings -> Arnold Settings -> Environment -> AiAtmosphereVolume)


Rigging Controls
Week_04
This week, we were looking at :
1. Main body Control (how to use and set-up them)
2. IK handles (how to adjust right direction and apply them correctly)
3. Controls for eyes, legs and arms.
MASH
Week_05
In this session, we were looking into a MASH network and how it is being used.
In the video on the left handsome, I created a Mash network of diamonds.
1. Created Diamond
2. Translate - 0 (specfically if using mesh option)
3. Added floor
4.added Dynamics node
5. Adjusted some settings
Pistons
Week_06
In this session, we were looking at the mechanical movement of the pistons.
Assignment
Week_07
Task:
To create a mechanical rig, apply mo-cap and use it with Maya MASH.
The first video on the left, shows just me, playing and trying out different effects with MASH.
Quadruplets
Foot Controls
In these sessions, we looked up the joint structure on an animal.
Setting up the spine and legs.
Setting up the correct joint rotation, using attributes and attributed components, blenshapes and their workflow.
Blendshapes
Elephant Rig Assignment
This is my final Lvl 5 rigging assignment.
I made joints, used IK Spline on the spine and ikHandles in the legs.
Used the pivot point location to create different different leg movements, constraints, eye blendshapes and controls.
I also used a ZBrush to create a displacement map and textures on the elephant..