Character Animation / Week 1
Bouncing Ball
In this lesson we were looking into animating bouncing balls depending on their material, heaviness, physics and ect.
We were trying to figure out the frame number to realistically represent bouncing balls on the screen.
To make the balls bounce, first we had to figure out how.
So there two methods how to set the key frames:
1. Automatic
2. Manual
Automatic one requires just a button at the bottom of the right timeline corner and every time, when the chanfes are made to the object it sets the key automatically.
Manual Key Frame set up requires 'S' letter to be pressed on the timeline every time the changes are made.
Freeze Transformation :
Freeze transformation helps to readjust objects location to 0, not depending where it is.
In the first video, I froze the location, so the balls would be just a bit above the grid.
Made one of the balls bounce as it would be a cannon ball, which requires less frames and less time to be displayed, on the other hand the balloon ball requires more time and more frames.
To help it look more realistic, we use the Graph Editor, which we can find in Animate section -> Windows -> Animation Editor. And by adjusting X Y Z we can reinforce the view of the moving objects.
Select one of the tangents -> press second mouse -> Break tangents.
Bouncing Ball with obstacles/Week2
In this session we were making squashy and bouncy ball, with obstacles.
To make it look effective, we had to use stretching and squashing method.
Once the ball is in the air and aiming for the obstacle - it stretches, when it hits the obstacle it squashes.
Very important, to make sure, that time and distance is balanced, otherwise it will not look realistic.
The first bounce in this video is really good, but the other ones, lost the balance between the time and distance, that is why, it looks more animated.
Parent and Child relationship/Week3
A very simple rig, made with a basic hand to show and example, how parent and child relationship works.
First, create an object, do not duplicate the shape, if it is going to be deformed, as it will affect the animation.
Then, start from the root of the objects, as this time it is the beginning of a hand (near shoulder), and select parent and a child.
To make it correct, make sure to select child first and then parent, so that animation would be right. And press 'P' on the keyboard.
Sack of Flour
Sack of flour is one of the most important basics, to understand the rigging and animating.
Each and every circle is a rig and it help to move that part of a 'body'.
Sack of flour can be hard a challenge to visualise as a living creature, but it is a really good practise to understand how the animation works.
In this video, I tried to make it look happy, angry and shy.
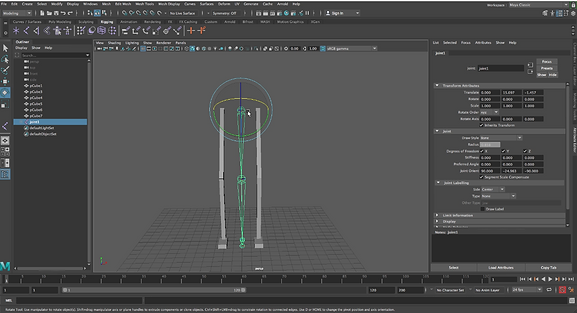
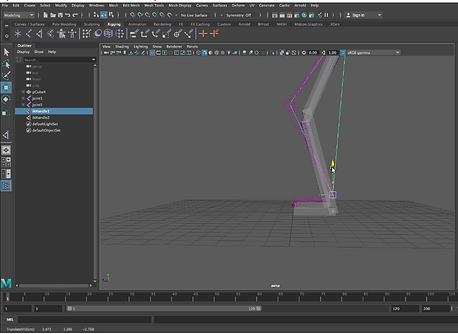
Rigging Legs/Week 4
Rigging legs is different than the top of the body.
Firstly, I had to create legs out of the very basic shapes.
Second, by using 'Create Joints' tool, I create joints. Each joint is placed on the places that going to make a movement. In this example, its top of the hip, knee, ankle and front of the foot.
To connect the joints, and make them move accordingly, we use 'IK Handle'
We connect the top joint with and ankle joint, and ankle joint with a foot joint.
It can get very hard to select the IK handles, thats is why, I created circle around the feet and parented it with the bottom IK Handle.
Important when creating IK handles, that the leg position would be a bit forward, so the identification of the movement would on the right side.
Animation goes the same. With selecting the key frames and positioning the the legs.
.png)
.png)
.png)
.png)
.png)
.png)


Character Posing/Week5
In this session, we were looking a different poses.
How different poses affects the position.
Important thing is to remember is a counter weighting! If a body leans on a side (it uses the body weight with the bones, not the muscles), then the waist and torso counter it by leaning in a different direction.
Head move
1.For a head move, it is important that head dips a bit in the centre of the movement.
2.Blinking
3. Body dips I bit as well
Lifting a Box/Week 7
This week, we were looking, how we can animate a character, that can lift a box.
1. Create locators (where hands grips the object)
2. go to Animation -> Constant -> Parent (locator to IK wrist)
3. Look out at the right up corner bar for 'Blend Parent 1'
Do not forget to use Animation Layers.


Week 8/Jumping of the Box
This week, we were making our character to jump of the box.
1. Look at the references (will help to understand positioning better)
2. Don't make too many unnecessary moves and keyframes.
3. Remember 'Anticipation' (way of making audience look at the move) and 'Overlapping' (going further before finishing move) Animations.
11 second club (Week 9/10/11)
Last Assignment for this module:
For this assignment, we were to choose one of the audio (http://www.11secondclub.com) and animate the character provided in the same website.
I chose November,2018, where a single person talks about the life.


I started working on a hero frames. (I worked on basic movements and poses).
Once I got the main poses, I started working and tweaking in between them.
I was using Animation layer, to help me with tweaking and separating different animation parts.
I decided to make different Animation layers for different frame count. For example: from frame 1-50 would be one animation layer and from 50-100, would be another.
This technique helped me to find mistakes easier and once I finished with the frames, I used a separated Animation layer to do the final tweaks.
Lip Sync
For a Lip Sync:
Use the rotation to adjust the jaw. It is important to find out when the jaw opens and when closes.
It is good to check by putting your own hand underneath the jaw and talk the script, to see when the jaw touches the hand, it mans it need to be animated to open up.
Making own Script to select jaw (or even anything else) easier:
1. Select jaw node
2.In the script editor find where it says (select -r jaw_control)
3.Save it to the new shelf
4.rename into and easier to define work for ex: u_jaw and save it as a MEL script.

P.S. That is a perfect example, why little scripts are very useful.


These are my references for the environment.
I was looking for something simple and dark.
In the end, my idea was just to use some of the building model from our previous assignments and use them for a background.


To help myself animating and key framing, I filmed myself in different poses, used After Effects to show the frames and by using this technique, it was a lot easier for me to decide the key poses and movements of the body, positions.
Final Work
In the Final work, I added non textured pavement and buildings, to keep it simple, no textures added.
I decided it to be an evening time and use my other model 'little robot Jaspy' as a listener.
I set up couple of cameras, used several directional lights and rendered the scene.


